We have completely redesigned our customer portal for you. If the steps described in the guide differ from what you see, you will find a PDF version of the old guide at the end of this article.
Create extensions in the Cloud PBX
To use the Cloud PBX, you must create extensions. This allows you to specify which phone numbers can be used to reach specific people or functions.
Extensions can serve different purposes, which is why we distinguish between “users” and “resources”:
User
A personal extension assigned to exactly one person, e.g., an employee.
Resource
A non-person-specific extension that can be shared by multiple people and/or performs a specific function, e.g., IVR, fax, hold queue, conference room, call flow, etc.
This distinction helps to clearly structure reachability and functions. When we refer to an “extension,” we always mean both “users” and “resources.”
In this article, we explain how to create and configure users and resources.
1. Call up Cloud PBX

Open my.easybell and click on “Cloud PBX” in the menu bar.
Depending on the function, the Cloud PBX uses two different types of extensions:
- User: person-specific extensions
- Resources: non-person-specific extensions
Please click on the relevant entry in the sidebar.
2. Add extension

Navigate to the “User” or “Resource” section, depending on the type of extension you want to create. Click “Add New User” or “Add Resource” to create a new extension.
3. Configure extension
Whether you're setting up a resource or a user, the process is very similar. One important difference is that you can only select the extension type for resources. The available options are
- General extension
- Conference
- Fax
- Hold
- Call Flow
- FQDN
The setup of the extension is divided into several tabs. The available options depend in part on the selected extension type.
3.1 Basic settings

Name: Choosing a meaningful name helps you keep track of things when you use many extensions. For users, you must enter the first and last name here.
Extension Type (for resources only): Here you can choose between different extension types.
Speed Dial: Users can dial the specified speed dial number instead of the full number to reach the desired extension.
Email: Here you can enter the associated email address that should receive future notifications. Entering an email address is mandatory for users.
Mobile number (SMS): Enter a mobile number here that should receive notifications in the future.
3.2 Phone numbers
Numbering Mode: The numbering mode determines how an extension can be reached. With “Extension from a number block”, the extension is assigned an extension number that, together with the main number, forms the complete phone number. With “Individual number or header number”, the extension is assigned its own complete phone number or uses a header number.
Phone number: Select the phone number for incoming calls here.
Extension: For number blocks, assign the extension, which usually also serves as a speed dial.
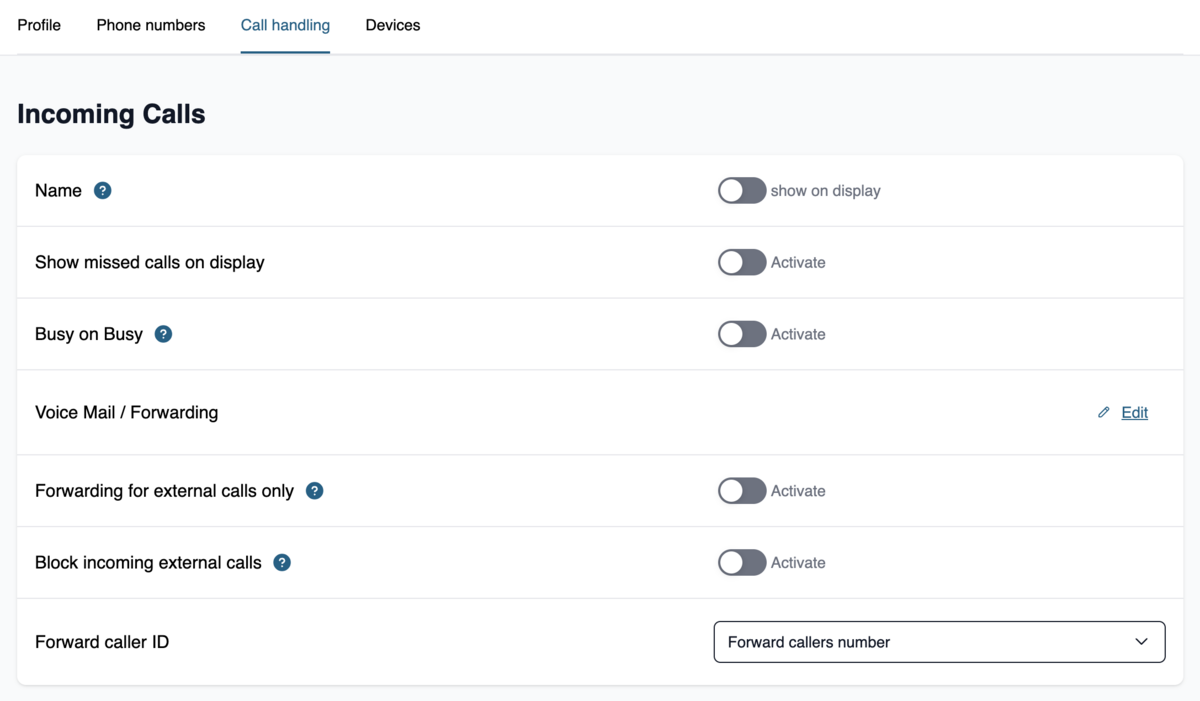
3.3 Call handling
(not for the “Fax” resource)
Extension Name: You can choose whether to display the extension name for incoming calls. This can be helpful when employees manage multiple extensions (e.g., press and support hotlines) so they can handle the call appropriately.
Show Missed Calls on Display: Would you like missed calls to be shown on the display? Then activate the switch.
Busy on Busy: If a device is busy, further incoming calls are rejected with “Busy,” even if other devices on the extension are actually free. This is useful when an extension is used by only one person. Please also refer to our detailed information on “Busy on Busy”.
Answering Machine / Call Forwarding: By clicking on “Edit,” you can set up the answering machine or call forwarding for this extension. Read our guide to call forwarding.
Forwarding for external calls only: Here you can exclude internal calls from call forwarding (Further information).
Block incoming external calls: Incoming external calls are rejected and no call forwarding takes place.
Caller ID for call forwarding: Displays the number of the called extension instead of the caller’s phone number during call forwarding. Based on the extension, recipients can better prepare for the call if, for example, they see that a call is coming in on the “Technical Support” extension.
Set after-hours switch
(Only for users and resources “general extension,” “hold queue,” & “IVR”)
After-hours switch: The after-hours switch determines how calls are handled when the line is unavailable.
After-hours switch for external calls only: This option limits active after-hours switches to external calls.
Audio file: Determines which announcement is played when the after-hours switch is activated.
Notification: Optionally, you can set whether a notification is sent for incoming calls while the after-hours switch is active.
Notification medium: Determines the channel through which notifications are sent. You can choose between SMS, email, or SMS & email.
3.4. Devices
(Only for users and resources labeled “General Extension” and “Hold”)

Here, you can assign devices to the extension. Click “Assign New Device” to assign devices to the extension on which you want to use it. As soon as you assign multiple devices to the extension, we refer to this as a call group.
If you haven’t set up any devices yet, you can use our guide “Add devices to the Cloud PBX” and assign devices later.
4. Finalize setup
Once you are satisfied with the settings, click “Save”.
Your newly created extension will now appear in the overview under “Users” or “Resources”.